Thursday, 24 September 2015

Sospeso work on MDF tissue boxes, pen stands and gift boxes

Well, here comes a set of Sospeso art on MDF surface. I have brought these cut-outs from The CraftsLane, India. They have nice laser cut MDF pieces including photo frames, mirrors and many more.

The wooden pieces are first painted with acrylic colors and then Sospeso flowers and leaves are designed and assembled on the surface to create some art pieces which can be nice gifts for your near and dear ones or can be used simply as a home decor pieces.

Set of tissue boxes. One is with a high color contrast and the other one is created with a subtle color theme of yellow and light blue.


Next comes a set of pen stands, or vases.


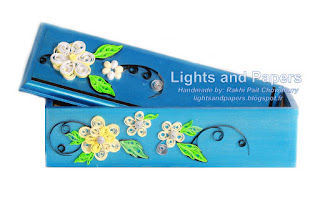
Finally a set of gift boxes with cool color themes of cobalt blue and viridian green. The boxes can be used to store jewelry or as gift boxes.

A snapshot while working on the boxes is also there :)


Sospeso is a 3D decoupage art, which really gives a ceramic finish when done on 3D surfaces. Sospeso can be also done on other surfaces like glass, paper, canvas etc. Sospeso art is also used to create exotic handcrafted jewelry pieces. I personally love this art form because of the finishing it gives at the end. The individual flowers and leaves are created by heat embossing technique and so it has to be done with a little bit of care and precaution. Adding some glass crystals or glitter balls (as is used here) can enhance the overall finish of each of the shapes.

Saturday, 19 September 2015

Quotation stand with a different touch

While working with different card stocks for my different projects, few cut-outs remain from the full-sized paper sheets. Using three such small card stock left-outs another quotation stand is ready today.

I have colored them with acrylic paints or added some effect with distressing ink or dry brush technique. The cardstocks are assembled on a white cardboard paper and the background is again created with three different distressing ink from Tim Holtz.

The quilled flowers used in this assembly is mostly my all time favorite Malaysian flowers and couple of composite flowers are also used on the quote area. One can put any customized quote or their favorite quotes based on specific theme or occasion. The leaves are created with basic marquise shape units combined in different composite shapes.

The birds used on the project are ready-made wooden embellishments with color effect created with distressing again, to match with the rest of the theme in this project.

Here come the pictures. The quilled flowers and leaves are assembled on a real stem cut-out  which is first dried and on which acrylic brown and black are painted thereafter.


Zoomed view 1

Zoomed view 2

Customized photo frame - Blue color theme

I started working on the assembly part for this frame on the auspicious morning of Ganesh Chaturthi, which was on 17th September this year. I was simply having a picture in my mind of how to assemble the quilled shapes when it just struck that it looked like "Ganesha Trunk and Crown" from one angle. This is how it looked and I quickly added a Ganesh silhouette in the center and captured the assembly in my camera :)


Just oriented the assembly top down and captured another angle and with this my celebration for Ganesh Festival, which I was missing a lot this year sitting in France is partly completed.

GANESH: Gives All New Energy and Spirit of Happiness

The final assembly of this customized photo frame in blue and orange theme colors looks a bit different, though. Here are some pictures of the completed frame :)


Zoomed in
Hoping to add more frames in this series, soon. 

Tuesday, 15 September 2015

Customized photo frame series continues

Here comes the second customized photo frame from A4 cardstock, keeping the same neutral color theme. Using black, cream and light yellow color mostly with adding a pinch of light green as an accent, the finishing is completed with the addition of golden glitter balls used in the centers of the Malaysian flowers.

The photo size which can be added here is 5/7 inches. Once can even use it as a nice quotation stand by adding any favorite quote with a picture as background in the blank area. The frame can, therefore, be customized based on the user's requirement.

The completed frame looks like this. I have added the butterfly to complete the look.

The flower at top left corner is made with beehive pattern.
Composite assembly with beehive patterned petals
Some other views of the frame are as follows and without the butterfly as well. Yesterday while I took the picture the blank area somehow caught my mind as the continuity seemed to be broken. I made this butterfly today morning and adding that simply completed the look as I wanted (see picture above).

Top left (zoomed in)

Quilled assembly (zoomed in)
The next plan is to create more such frames with differently colored themes. Please stay tuned :)


Sunday, 13 September 2015

Textured candles using natural props

Sunday is here again and my trial on textured candles using natural flower petals and leaves as props is completed.

These are candles using paper-cup mold and paraffin wax. The idea of using natural props is known to create some customized designs on candles. The props can be arranged in a particular way near the surface of the mold before you start pouring the melted wax inside it.

Using bigger sized molds (aluminum or steel) can give nicer results where you can play with the design in more creative way due to enough space. These are the first trial on using these props and as I complete each candle every week, lot of new ideas and designs come in mind. I have to now wait till I restock my candle making materials and convert my creative ideas into reality :).

Hope the time comes soon. Till then enjoy!


Tuesday, 8 September 2015

Seasons greetings with simple quilled post cards

Plain cardstocks, some distressing technique, and paper quilling to design season's greetings with customizable quotation was on today's creative fun-list.

Quilling the stars with 2D and 3D assembly technique, which I had shared in one of my recent posts, can be used to create these greeting cards or post cards with customizable writing options according the occasion or theme of your own choice. For example, the cards with stars can be used as season's greetings for Merry Christmas or Birthdays.

Instead of putting them inside envelopes, these postcards can be enclosed inside shadow box frames of appropriate size not only for better storage purpose but with some creative gifting ideas.

Here come the three different cards which I made today :). Express your feeling by you own words on these quilled postcards.
6/8 inches postcard with old paper look and a star

3/4 inches postcard with star, lacework and quote box

4/6 inches quotation stand with quilled flower and leaves assembly

These are quick and simple gift card ideas and I really enjoyed making them all. Hope to make some more with different colored themes.

Sunday, 6 September 2015

Set of Jar and Prop candles


It is another Sunday and my second trial on candle making is completed. :)

The first one is a set of prop candles using paper cup moulds and props with a layering of white and yellow colours using paraffin wax.
 Next was the plan to use some old jars from my kitchen and create some jar candles out of them. Well, this is the very first attempt and as I complete the first two, few more designs came into my mind and hopefully will share them soon once they are ready.

Set of three prop candles


Here are the jars that I have chosen ...

And now I have converted them into jar candles with candle props and chunks.

Jar chunk candles with layering


This is the full set for today :)

Hope to add some more in the kitty soon. Please also visit my facebook page "Lights and Papers" to stay updated.

Quilled Photo frame_Theme Brown and White

Instead of buying a photo frame and decorating it with paper quilling or sospeso, the alternate option is to create a photo frame from scratch using simple cardstock papers.


I have taken two different color textured cardstock papers in contrasting colors. Keeping the theme colors as brown, yellow and white I have cut out a 5/7 inches (width/length) space on the brown paper. Then it was glued over the yellow textured paper to give a photo frame like structure. Both the cardstocks are of a standard A4 size which is 8/10 inches. Sizes are customizable.
Daisy and Malaysian flowers assembled on silicone glue (Anabond 666 RTV)

The following quilled shapes are used to create the 2D assembly on the brown paper as shown below:

Specification of paper strips for:

Daisy flower:
(1) White strip from Quilling essential (you can use any other brand as well)
(2) Length 10.5 inches
(3) Width (3 mm)

The Malaysian flower petals are also with same specifications. For tutorial on Malaysian petal please watch the video below:

https://www.youtube.com/watch?v=HzrDZk5zt44

For the center which is a full-length fringe flower please follow the video link below:

https://www.youtube.com/watch?v=JPR4iWKIkr8

For the leaves:
(1) Light green and Dark green paper strips from Quilling essential (or any other brand)
(2) Length of each strip taken is 10.5 inches and joined together to give a full length of 21 inches. The quilling can be done from either end of the paper strip depending on whether you need the dark or the light color inside.
(3) Width (3 mm each)
(4) Set of three and five leaves quilled in Marquise shape are assembled.

For the butterfly:
(1) Yellow and white paper strips from Quilling Essential (or any other brand)
(2) Length of each strip taken is 5 inches and joined together to quill into tear-drop shape.
(3) Width (3 mm each)
(4) The wings are created in a set of 3 tear-drops each side and then assembled separately on the center. The center is created from 10.5 inches black strip (3 mm width) by combing.


For some nice butterfly tutorials, you can follow one of my favorite blogs by "Ayani Art".

With that here comes the final photo frame once more


Thank you very much for reading this and please follow my Facebook page "Lights and Papers" to stay updated.


Ceramic work

The first workshop I attended, apart from paper quilling, had been the ceramic mural workshop with Master Dutta Vaidya from Jaipur, in the year 2013. It was organized by my closest friend and an amazing artist Ms.Shabana Patel, at RT Nagar. The art piece which I learned and completed in this 7-day long workshop was a MERMAID. I learned how to sculpt with M-seal, how to apply painting and how to give the craft a glass or ceramic finish. The face is completely sculpted by Masterji as doing a human face is not so easy on your first trial. Here comes the completed piece of art.


The next M-seal craft, which I did it on my own, was a customized order from my friend, Ms. Jaya Singh, as a decorative piece for her home. She has provided me a wooden plaque of 16/16 inches size, covered with a textured paper on top, added by her. Here it comes, a sculpted leaf with a floral design (inspired from a design from a decorative piece on a home decor website), and with a glossy acrylic finish. Jaya had added a small Ganesha on the top right corner of the piece before framing it. I was more than happy when I saw the smile on her face while holding it.


Later I have improvised upon this art by creating many miniature forms on canvas, metal holders, wooden plaques, MDF cut outs etc. Even I have created small key chains and earring.  

These key chains created by M-seal art and acrylic painting is again some of my old works. In fact, my first order from one my very close family member come friend was to create the set of 30 key chains customized for a farewell occasion in their organization.

Later I have designed few more and customized as per requirement from my friends and acquaintances.
Ceramic work  of Ganesha inside metal frame to create earring
Set of keychains with name initials

Keychain within metal frame and name initial with wooden embellishment

Keychain within metal frame and with flower embellishment


This one is one more from the M-seal art section, some of the work which I did in 2013 during my stay in Bangalore. I was also teaching then through my hobby class venture,  Creative Nest" The peacock work was done on a wooden plaque, with oil painting and a glass finish on ceramic using epoxy resin mixture.
Oil painting work is going on


And here is the final finished form.


Quilling work on 3D surface

Like Sospeso, Paper quilling can be also used to adorn different 3D surfaces with unique assemblies. MDF cut outs of photo frames, plaques, coasters, pen stands, trays, boxes, gift tags and many more are available in craft stores as well as can be ordered online from The Crafts Lane.

The 3D surface can be prepared first by applying acrylic colors and then adding an acrylic spray to give a matte or glossy finish as required. Acrylic sprays, varnish, sealants etc are available in any paint store or can be ordered online from E-bay or Amazon.

The work that I am posting here is created a couple of years back as orders from some of my friends. All these can be a nice gift for many occasions and can be customized as well based on the choice of background color, type of assembly and color of paper strips.


Set of customized photo frames
Jewelry box (long rectangular)
Pen stand


Jewelry box (hexagon)


Quilling can be also added on a glass surface. It can be nicely combined with other art forms or painting as I had combined here with one glass painting created by me almost 3 years back.


Please visit my facebook page "Lights and Papers" for more pictures and project ideas.