Tuesday 29 October 2013

The Royal "R"

After a long time tried my hand with my best favorite "Paper Quillography", writing with Paper quilling :)

Here come the majestic font with an "R" monogram .....go Green.....

Size: A4
Patterned glossy paper as base
Fluorescent green and bottle green used for the swirls and the beehive patterns
The outline is done by 4 mm wide text-quilling strips from Art'zire :)

Express your feelings with greeting cards

Here comes few trials on some greeting cards, specially designed to be used for any occasion.....these are all blank cards, made from A4 sized colorful card stocks and other scrapbooking materials like paper doilies, laces, embellishments and definitely my favorite paper quilling to make beautiful floral patterns on top......


One more with decorated paper doily and applying some distressing effect over the edge....:)


Friday 30 August 2013

Ganesha and Shringaar

Here comes my art dedication for Ganesha Chaturthi… A Ganesha mural painting on 12/16 inches canvas.


This had further motivated me to create "Shringaar" [dressing up] on 18/24 inches canvas.


Thursday 18 July 2013

Joyous "JOY"

"Joy delights in Joy"
--William Shakespeare
‘Being happy doesn't mean that everything is perfect. It means that you've decided to look beyond the imperfections …..’
With that theme here comes my new completed project on quillography or texting through the art of quilling, “JOY”.
I was thinking of combining acrylic painting and quilling, and also a little touch up to give a “crack” effect on the acrylic part. I chose the word “JOY” in emporium capitals font which really looks like a royal font itself.

The Word is first painted on the pearl blue craft paper with orange as primary color, coated on top with cracking medium and then the secondary yellow color was painted, and kept for drying till the cracks came up completely.

The Word is first painted on the pearl blue craft paper with orange as primary color, coated on top with cracking medium and then the secondary yellow color was painted, and kept for drying till the cracks came up completely.

Now, painting is done and next step was to outline each letter with the paper. I have used 4 mm fluorescent green text paper for the outlining and 2 mm quilling strips of black, green and sky blue color to make the basic quilled shapes.
And, so here comes my happiness, a joyous “JOY” ….


Thursday 4 July 2013

Shubh Labh….Ganesha

Well, this one is a mural on a wooden base (MDF) that combines acrylic painting with cracking effect and Shilpkar m-seal (from Hobby Ideas) to make the 3D work.
The wooden base was first colored with the first color, which I have chosen as Orange and applied it using a flat brush (size 10), with a little addition of water and more of color.
Next the Quick Krack medium was applied once the orange color coat gets dried completely and this time the medium has to applied with single brush strokes, from top to bottom, and no re-touch ups can be done (IMP).
Next the second color coat that I have chosen as white here and this second coat has to be applied when the cracking medium is semi-dry (kind of sticky feel) again with single full dry brush strokes (flat size, 10). As and when applying the second coat the cracks will start appearing and no touch-ups should be done on those. The base is then kept for drying completely.
In d mean time, we can make small 3D murals (can be anything depending on our own creativity and also on a particular theme). I have made this as a small wall-hanging that can be gifted to anybody, friends, family….praying for their well-being and prosperity. Lord Ganesha protects us from all difficulties with his blessings and brings peace, prosperity and success to new beginning.
The mural is painted with black acrylic color (hobby ideas) completely and then once dried a touch up was given with pearl gold color using dry brush strokes (hobby ideas).

And here is the final art form:

Another 3D Ganesha Mural with acrylic finish on 8X10 inches wooden plaque:

And one more on an MDF box and on a canvas


Sunday 16 June 2013

Some old quilled typography works by me


I really love to spend my time at HOME when I have holidays or on the weekends when the office is closed. I really don’t get bored at all and don’t even feel the urge to go out!! Even if I go for shopping I finally find myself roaming in the stationary corners and reliance time out or in the city market (with proper planning) to buy stuff for my craft works. I really feel that my shopping focus has shifted from buying cosmetics and dresses. :P
So here is my second board on a word, made by quilling
The font type is “ARIAL” (small letters) and the beehive is done by loose coils made with graduated yellow-orange and yellow-white paper strips of width 2mm.
The flowers are Malaysian flowers on top of basic quilled flowers. Leaves are made with two tone green-white paper strips.


Here are some more:

This one is one of my favorite one from the stock, "Krishna". The peacock feather is the real one which is used as an embellishment.


After this, I have made this one which is "Shiva" with a blue color theme and again one of my favorite from the stock.


Happy birthday frame

Customized nameplate

Customized quotes


All these are either sold or gifted to friends and family. And, I am happy that my creations are now spreading happiness.

Mural painting_Radha Krishna Series

A small gift for my sweet Maa…
I have finished my 3rd canvas Mural painting. This is also on a 12X16 (A3) sized canvas and the painting are named as “Krishna wooing Radha”, that describes Krishna and Radha and the “Gopis”. I loved doing the “dot-shading” parts in the figures. “Sap Green” is the predominant color in this picture.  This is my first mural painting on Radha Krishna.


The following two are next in this series.


Tuesday 4 June 2013

The Famous Art of Jaipur...GOLD painting on MARBEL

Wow !!! That's the word that came out from my heart when I saw the final handmade Jaipur art piece that I was able to make in 3 days, in a Jaipur miniature art workshop,  still ongoing in RT Nagar, Bangalore. My BIG Thank you (maybe thank you is too small to explain my actual feelings and respect) to an eminent artist from Jaipur, Master Vishnu Soni, who came and taught us this beautiful masterpiece of art. Other things that will be covered were miniature Jaipur painting, miniature Mughal painting, stamp and postcard painting etc, in the 10 days long workshop. A big thanks to Shabana, who organizes these workshops at her school, THINK COLOR and we get an opportunity to work with the actual artists. Last time, it was a ceramic 3D Mural, that I learned and had already posted.

Coming to "Gold Painting on Marble", each and every step was a learning process. Starting from the handmade pencil sketch, embossing, gold covering, meenakari and the final touch up with stones were so intricate. I was really nervous when I was doing the pencil sketch. I have in fact forgotten when I had last done a pencil sketch, maybe during my school days!! Sir made we practice on trial plates till we reached the perfection. Perfect finishing  makes any art piece "awesome" and that's what I learned from every artist who taught me different forms of arts. That's made the difference. The knowledge that gets transferred is just priceless. Now I truly realize how much labor, attention and affection one has to devote to make a piece a "masterpiece".

I am really happy to see the final piece, and for a second could not believe that I made these !!!
 Few snapshots of the making:

(A) Freehand pencil sketching on marble
 (B) Embossing followed by painting with pearl gold color
 (C) Covering with 24 karats pure Gold leafs ("Patris")...its pure gold only !!

And then multiple steps that include the outlining, shading, use of stone colors, meenakari with glass colors and finally adorning it with stones :)

List of material used to make this piece:


  1. Marble cut pieces (from Jaipur)
  2. Texture white and Fevicol mix(3:1) ..for embossing
  3. Pearl gold color hobby ideas
  4. 24 karat gold leaf
  5. Stone outlines
  6. Stone shading color
  7. Special handmade brush made of hair from Squirrel tail (it's a must for this kind of painting)
  8. Water
  9. Glass color red and green
  10. Poster white and yellow
  11. Border color stone yellow


Similar painting can be done on black chart paper, of different sizes and also of different types of designs e.g musical instrument. I have selected this royal jewelry set of necklace, kilonji (used to adorn the crown), and broch-bangle set. The final one, bound in a golden bordered wooden frame, talks all about it !! I feel lucky :)

Monday 27 May 2013

Ceramic Mermaid and Peacock Murals with Glass Finish


Here comes my first trial on ceramic mural (3D). I learned the techniques in a workshop from invited artists from Jaipur. It was an amazing experience starting from using the M-seal to the finishing touch.

Here is the one which I learned and made during the workshop, a big, almost 16X 20 sized oval 3D mural, with an antique glass finishing. Obviously to mention that the face is done by the “Karigar” himself and to get into that perfection really needs a skill and lot of practice.


As I do always, once the workshops are done, is to go and buy the materials and keep it in store. With that, I started on my first trial, a solo trial, on an A4 sized MDF board. I chose a simple picture of a “Peacock” and traced it on the MDF board. The materials used were:
·         White M-Seal (for the sculpting work)
·         Different tools for the patterns (simple tools like wooden knife, toothpick, backside of a pen, different patterned objects etc)
·         Powder (to smoothen down the surface)
·         White acrylic paint
·         For rest of the shading and coloring part “Oil colors” are used (base was turpentine)
And this is how it looks as I was done with the M-seal work, and the initial part of white coat and oil color shading of yellow and green are done.


The final finishing was done by "BOSNY" acrylic spray (glossy one) followed by a glass finishing using epoxy resin coat. After drying it for 4-5 hours, the final piece was done and here is the picture:

Initial M-seal work is a little tedious and time consuming and can get a little messy too!! After that, the coloring part was really enjoyable and yes, once the finishing is done the product really looked amazing to me. I made my first 3D ceramic mural :)

Saturday 25 May 2013

Lady in Red

Well, my first trial on paper quilling on figures. The picture is taken from an old greeting card and then quilled with the black strip to get the outline. Beehive technique is used to make the RED gown of the Lady, along with acrylic paintings in some parts.I loved making the Roses and the Malaysian flower in the middle. :) The leaves are made with simple combing technique.

Anirban specifically told me to make the gown RED and this is dedicated especially to him. That's all ......a simple way to convert any picture that you like to a beautiful quilled piece and also to convey something special to your special ones through your own creation :)

The complete picture....here it goes:


to you with LOVE :)

Friday 24 May 2013

NATARAJA AND LADY WITH A FLUTE

After a long thought process, I finally started with my first blog. Past 6-8 months were full of excitements for me as I realized a new "Me" in myself through the learning phases of different arts and crafts. Science and Art have no conflict. I am a devoted Scientist at work, but I do feel that there was always an "Artist" inside me, waiting to introduce herself in the mesmerizing world of infinite creativity. I can also leave some mark through my work, although still at the amateur phase.

 Even though spending most of my weekly time on research and household activities, when it comes to giving some time and space for yourself, I have decided to choose arts and crafts. I realized it late, but better late than never!

I started learning paper quilling (a beautiful Italian craftwork), since November 2012, and that's when I slowly started to accomplish the "passionate me". I learned different forms of paper quilling, glass paintings, mural paintings, ceramic work, jewelry making and still the list goes on. Learning has no end. And if it is something related to art and creativity its just infinite.

So, after this big introduction I would like to start with my experiences and different steps of learning a Kerala style canvas Mural painting. I am not a professional painter, but yeah, I did have some training during my school days when along with other kids I also used to go to a painting school. I got my basic training on sketches and colors then, but after that a long break of 20 years to get re-started with painting again, and also first time on a canvas and I was super-excited.

I went to a hobby class near my home in Bangalore and learned two different types of mural art. The word "Mural" originally signifies any piece of artwork painted or applied directly on a wall, ceiling or other large permanent surface. This was not in a wall, though, but a miniature mural painting on canvas. The canvas size was 16 X 20 inches and the colour used was "Artist Grade Acrylic Colours" (instead of the original vegetable colour that are used for mural paintings,largely seen on the temples in Kerala).

The learning phase was brilliant, starting from tracing technique, giving multiple coats of color "wash" to the canvas to the final finishing touch using waterproof drawing ink. I learned how to use acrylic colors on canvas, how to be patient while applying the several coats of washes (dilute colors) to it.!! Here are the steps as I understood:

1. Tracing the complete picture on canvas using pencil carbon (one needs to learn what to trace and what to not!)
2. Giving an orange outline to it and then giving an initial wash to the canvas to clean it up
3. Start with the yellow (yellow ochre) wash first. (multiple times, 4 coats look ok)
4. Then start with the orange washes and shadings (I learned what should be the ideal brushing technique for shading)
5. Then washes and shadings with other colors (mostly green and Prussian blue).
6. Drawing different patterns like "Ra-Ra-Ra" (mostly seen in the borders and the jewelry)
7. And finally applying the final outlining with the black ink, and the finishing touches that give it that "mesmerizing" look.

I felt that the patience and time that went for a single painting is worth doing, especially out of the reward one gets after the painting is complete !!

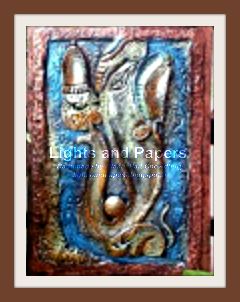
So here's come my NATARAJA ....that I learned in the class.

I felt so much overwhelmed that I kept looking into the picture again and again and started collecting different mural pictures from the internet to make my own library.
I started soon with my second attempt and here is a step by step progress with my next creation of mural painting (12 X 16 inches) on canvas, which I named as "LADY WITH A FLUTE"


 1. Yellow washes were done


 2. Orange washes and shadings are done


3. Greenwashes and shadings
4. The black outlining and making the "ra-ra-ra's"
 And the FINAL one :)


Hope you enjoy this and there's more to come :)

With love
Rakhi